Table of Contents
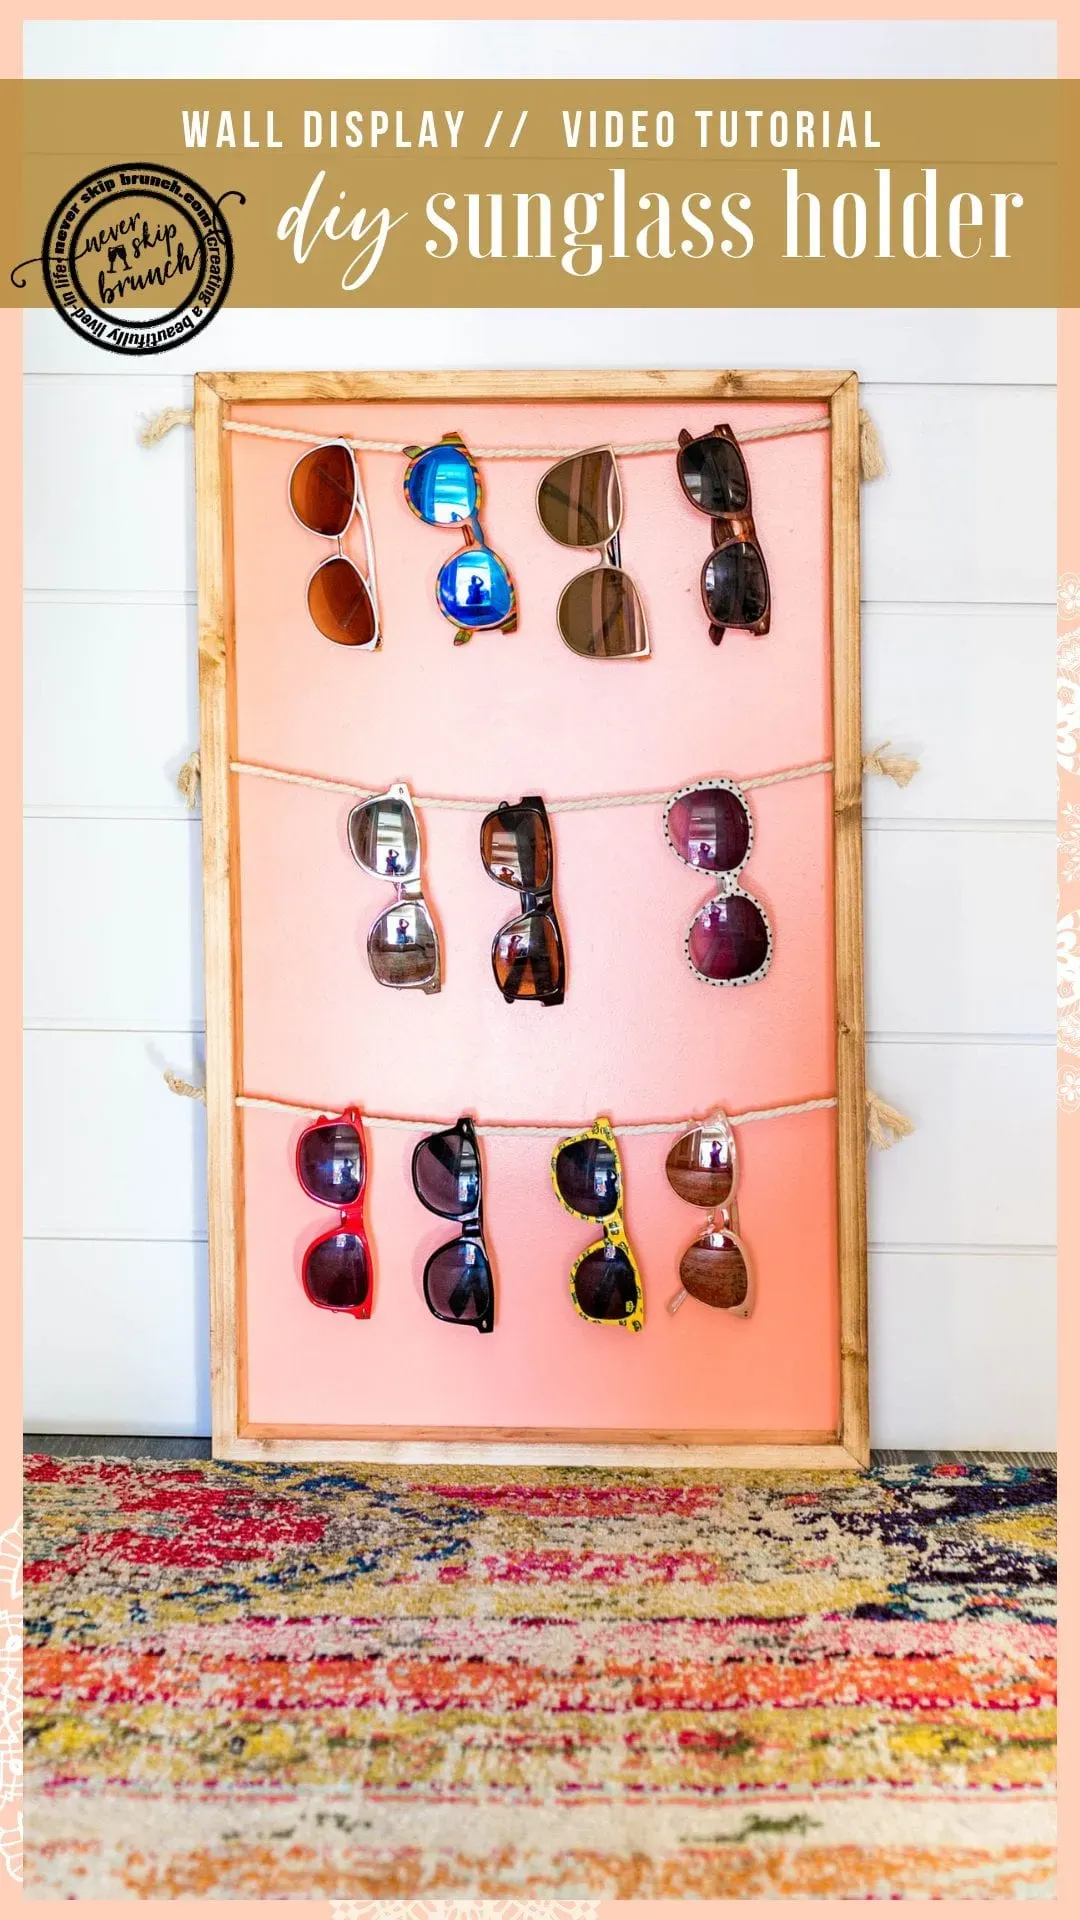
Ever spend five minutes digging through drawers or searching surfaces for your sunglasses, only to find them scratched or tangled with other stuff? It happens to the best of us. Those essential accessories, the ones that shield your eyes and complete your look, often end up scattered, lost, or worse, damaged. Leaving them on the dashboard invites warped frames, and a chaotic catch-all bowl means you're playing eyewear roulette every morning. It’s frustrating and frankly, a waste of time and money when you have to replace a favorite pair because you couldn't keep track of them. What if there was a simple way to keep your shades organized, visible, and protected? Enter the world of the diy sunglass holder. Creating your own storage solution isn't just about tidying up; it's about giving your eyewear collection the respect it deserves and making your life a little easier. This guide will walk you through building a practical and stylish way to store your sunglasses, using materials you might already have or can easily find. Forget the clutter and say hello to organized style.
Why You Need a DIY Sunglass Holder (And What You Can Make)
The Chaos of Unorganized Eyewear
Let's be honest. Those sunglasses you love? They're probably living a chaotic life right now.
They're crammed in a drawer with who knows what else.
They're tossed on the bedside table, perilously close to getting knocked off.
Maybe they're riding around in your car's cup holder, just asking for scratches.
This lack of a dedicated spot isn't just untidy; it's a fast track to damaged lenses and bent frames.
Trying to find the right pair as you're heading out the door becomes a frantic search.
It wastes time and honestly, it's annoying.
Keeping track of your shades shouldn't feel like a full-time job.
Having a designated, safe place for them just makes sense.
Why Go DIY Instead of Buying?
Sure, you can buy a sunglass organizer.
Plenty of plastic or generic options exist.
But often, they don't fit your specific space.
They might not hold your particular style of glasses well.
And let's face it, they can be surprisingly expensive for what they are.
Making a diy sunglass holder gives you control.
You decide the size.
You pick the style.
You use materials that match your decor.
It's usually a lot cheaper than a store-bought solution.
Plus, there's a certain satisfaction in building something useful with your own hands.
You can tailor it exactly to the number of sunglasses you own.
No more awkward gaps or overflowing slots.
Common Sunglass Storage Woes Solved by DIY:
- Scratched lenses from being tossed together.
- Bent frames from being crushed in drawers.
- Wasted time searching for a specific pair.
- Cluttered surfaces (entryways, nightstands, desks).
- Sunglasses getting lost or misplaced easily.
- Lack of a display method for nice pairs.
Tailor-Made Storage for Your Collection
The beauty of a diy sunglass holder lies in its adaptability.
You aren't stuck with a one-size-fits-all solution.
Got a massive collection? Build a large wall display.
Need something small for your desk? Craft a simple stand.
Live in a rental? Use command strips and lightweight materials for a renter-friendly option.
You can use wood, fabric, rope, even repurposed items.
Think about the space you have available.
Consider the look you're going for.
A rustic wood holder.
A modern minimalist design.
A colorful, playful rack.
It's all possible when you take the DIY route.
It's not just storage; it's a piece of functional decor you created yourself.
Gather Your Gear: Materials for Your DIY Sunglass Holder Project
Gather Your Gear: Materials for Your DIY Sunglass Holder Project
What You'll Need to Get Started
Alright, so you're convinced you need a dedicated spot for your shades. Great. Now, let's talk about rounding up the necessary bits and pieces. You aren't building a rocket ship here, just a straightforward holder for your eyewear. The exact shopping list depends on the specific style you choose, but generally, you'll be working with some basic materials. Think wood – maybe some 1x2 lumber or a small project panel board if you want a solid back. You'll likely need something to hold the glasses, like cotton rope, dowels, or even clips. Don't forget the stuff to put it together: wood glue, screws, maybe some nails. And you'll want to make it look presentable, so grab some sandpaper, stain or paint, and a brush. Finally, consider how you'll hang it – picture frame hardware is a solid bet for wall mounting.
Building Your DIY Sunglass Holder: StepbyStep
Building Your DIY Sunglass Holder: StepbyStep
Cutting Your Materials and Building the Frame
Alright, let's get some sawdust flying. The first real step in creating your diy sunglass holder is getting your materials cut to size. If you're using lumber for a frame, measure twice, cut once – your geometry teacher was right. You'll need pieces for the top, bottom, and sides. Once you have your pieces, it's frame assembly time. You can use wood glue and clamps for a clean look, or reinforce with small nails or screws if you want extra sturdiness. Just make sure everything is square before the glue dries or you drive those fasteners home. A wonky frame is going to look... well, wonky. Take your time here; a solid foundation makes the rest of the project much smoother.
Adding the Backboard and Prepping for Holders
Next up, let's give your frame a back. This provides stability and a surface to attach your sunglass holders to. Cut your project panel or other backing material to fit snugly inside or behind your assembled frame. This is also a good time to think about how you want it to look. Painting or staining the backboard now, before attaching it, is usually much easier than trying to do it later around the frame. If you plan to use rope or dowels threaded through holes, mark exactly where those holes need to go on the backboard or the frame itself. Consistency is key here so your glasses hang evenly.
Common Cutting and Assembly Tools:
- Measuring tape
- Saw (hand saw, miter saw, or circular saw)
- Wood glue
- Clamps
- Drill
- Screws or nails
- Sandpaper (various grits)
Drilling, Finishing, and Attaching the Holders
Now for the slightly more technical bit: drilling. Using a drill bit appropriate for your material and the diameter of your rope or dowels, carefully drill the marked holes. If you're using rope, drill two holes for each loop you want. If you're using dowels, one hole per dowel end into the frame or back is sufficient. After drilling, sand everything down – the frame, the backboard edges, the drilled holes. Get rid of any splinters or rough spots. Then, apply your chosen finish: stain, paint, or just a clear sealant. Once that's dry, it's time to attach your backboard to the frame and thread your rope or insert your dowels. Secure the rope ends with knots or glue, or glue the dowels in place. Add your hanging hardware to the back, and voilà, you're ready to hang your new Building Your DIY Sunglass Holder: StepbyStep creation.
Make It Yours: Customizing Your New DIY Sunglass Holder
Make It Yours: Customizing Your New DIY Sunglass Holder
Adding Your Personal Flair with Finishes
Alright, you've got the basic structure of your diy sunglass holder built. It's functional, sure, but maybe a bit... plain. This is where you inject your personality. Don't just slap on any old paint. Think about the room where this thing will live. Does it scream modern minimalist? Go for a crisp white or a sleek black. More of a rustic farmhouse vibe? A dark wood stain or a distressed paint finish will fit right in. You could even get creative with a stencil pattern or a two-tone effect. Remember, this isn't just a storage unit; it's a piece of your decor. Make it look like it belongs, not like you just nailed some scrap wood together in the garage (even if you did).
Consider the texture, too. A smooth, glossy finish is one look, while a matte or slightly textured paint offers something different. If you used rope, maybe dip the ends in paint for a pop of color. The details matter here. A little effort on the finish elevates your project from 'homemade' to 'handmade with intention'.
Going Beyond the Basic: Decorative Touches
So the paint's dry, the stain's set. Now, how do you make your diy sunglass holder truly unique? This is where the fun really starts. Think about adding decorative elements. Maybe some cool knobs or hooks on the bottom edge for hanging keys or cleaning cloths. You could attach a small metal plate or a painted tag to label different sections ("Daily Wear," "Special Occasion").
Got a pile of leftover craft supplies? This is their moment. Buttons, beads, even small painted stones could be glued on for texture and visual interest. If you're feeling ambitious, try a small wood burning detail if you used a wood backer. Just keep it tasteful; you're aiming for charming, not cluttered. A small framed picture or a piece of fabric art could even be integrated into the design if your holder has a solid back panel.
Ways to Add Unique Details:
- Paint or stain effects (distressing, stenciling, two-tone)
- Adding decorative knobs or hooks
- Incorporating small labels or tags
- Attaching craft items (buttons, beads, small tiles)
- Wood burning or carving (if using wood)
- Integrating fabric or small art pieces
Adapting the Design for Different Needs
Maybe the standard wall-mounted design isn't quite right for you. That's the beauty of DIY – you can tweak it. Need something for a dresser top? Shorten the design and add a stable base. Want to hang it inside a closet door? Use slim profile materials and strong adhesive strips instead of screws. If your collection is massive, build two side-by-side or stack them vertically.
Think about the types of sunglasses you own. Large, oversized frames might need more space between the holders than smaller reading glasses. Adjust the spacing of your rope loops or dowels accordingly. If you have a mix, maybe create different sections on the holder. One side for big sunnies, another for readers. It's your project; make it work for *your* specific eyewear situation, not some generic ideal. This adaptability is the real power of a custom diy sunglass holder.
Your Shades, Sorted: Final Thoughts on Your DIY Sunglass Holder
So there you have it. No more frantic searches, no more bent frames shoved into a drawer. Building a diy sunglass holder might seem like a small project, but it solves a real problem for anyone with more than one pair of sunglasses (which is most of us, let's be honest). You've invested in your eyewear, whether they're designer shades or just a trusty pair for driving. Giving them a dedicated spot keeps them in better shape and makes grabbing the right pair effortless. It’s a functional addition to your space that you made yourself, which is always a bit satisfying. Stop letting your sunglasses live a chaotic, unprotected life. Build them a home.