Table of Contents
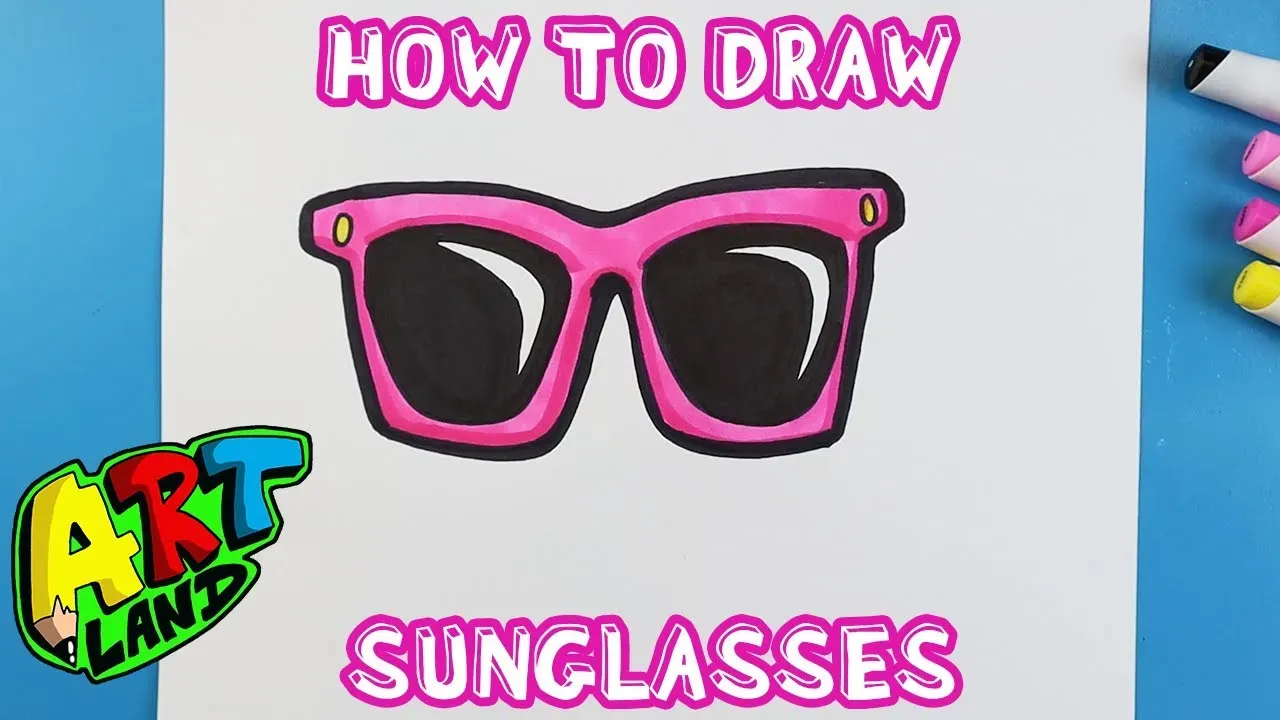
Ever feel like something is missing from your masterpiece? Maybe it’s that cool factor, that touch of effortless style? Often, that missing piece is a pair of sunglasses. They aren't just eye protection; they're a statement. Learning how to draw sunglasses can elevate your portraits, add personality to your characters, or just be a fun way to doodle. But where do you start? Those curves, the reflection, the way they sit on a face – it can seem tricky.
Starting Simple: The Basic Shapes for How to Draw Sunglasses
Starting Simple: The Basic Shapes for How to Draw Sunglasses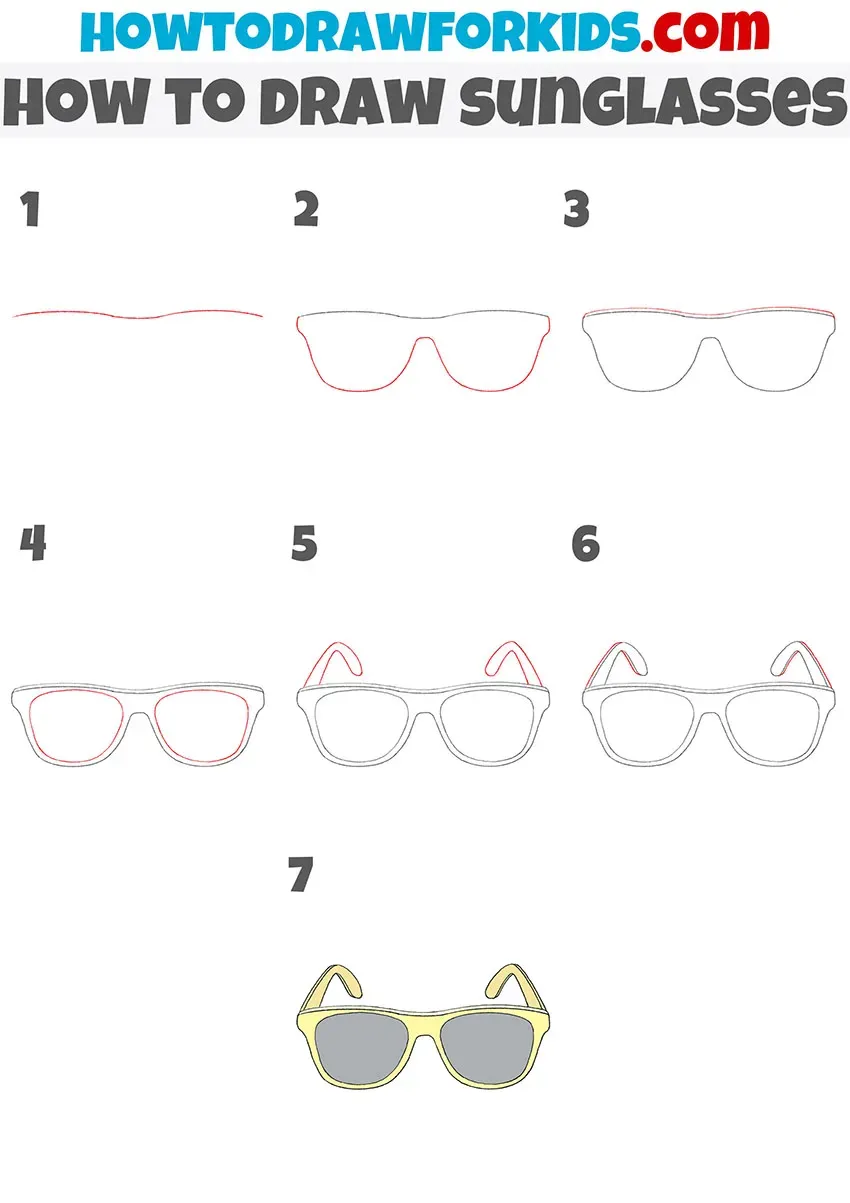
Finding Your Lens Foundation
Alright, let's kick things off with the absolute basics. When you're figuring out how to draw sunglasses, don't immediately think about intricate details. Start with the lenses themselves. Most sunglasses lenses are essentially two oval or slightly rounded rectangular shapes. Think of them like two sideways eggs or elongated jellybeans. Draw these shapes first, giving them a bit of space in between for where the bridge will go. Don't press too hard with your pencil; these are just guide shapes. Getting these initial lens shapes right is key because everything else builds off them. If your lenses are lopsided from the start, the whole pair will look a little off-kilter.
Connecting the Dots: The Bridge and Frame Outline
Once you have your basic lens shapes in place, it's time to connect them and sketch out the frame. The bridge is the part that sits on your nose. For many styles, this is just a simple curve or a slightly angled line connecting the two lenses. The frame outline then goes around the lenses. This is where you decide if you want thick, bold frames or thin, delicate ones. Just draw a line slightly outside your lens shapes, following their curve. This creates the border. Keep it loose at this stage. You're just blocking in the main structure.
- Start with two simple shapes for lenses (ovals, rounded rectangles).
- Leave space between the lenses for the bridge.
- Sketch a simple curve or line for the bridge connecting the lenses.
- Draw an outline around the lenses for the frame border.
- Use light pencil strokes for these initial shapes.
Adding the Arms (Temples)
Now for the parts that go over your ears – the temple arms. These usually extend straight back from the outer corners of the frames. For a basic front view, you'll likely only see the very beginning of these arms, extending outwards horizontally from the frames. Draw simple, slightly tapered rectangles or lines coming from the frame's edges. The thickness of these arms should generally match the thickness of your frame outline. They don't need to be long in a front view, just enough to show they exist. These simple additions suddenly make your shapes look much more like actual glasses.
Adding Detail and Style to Your Sunglasses Drawing
Adding Detail and Style to Your Sunglasses Drawing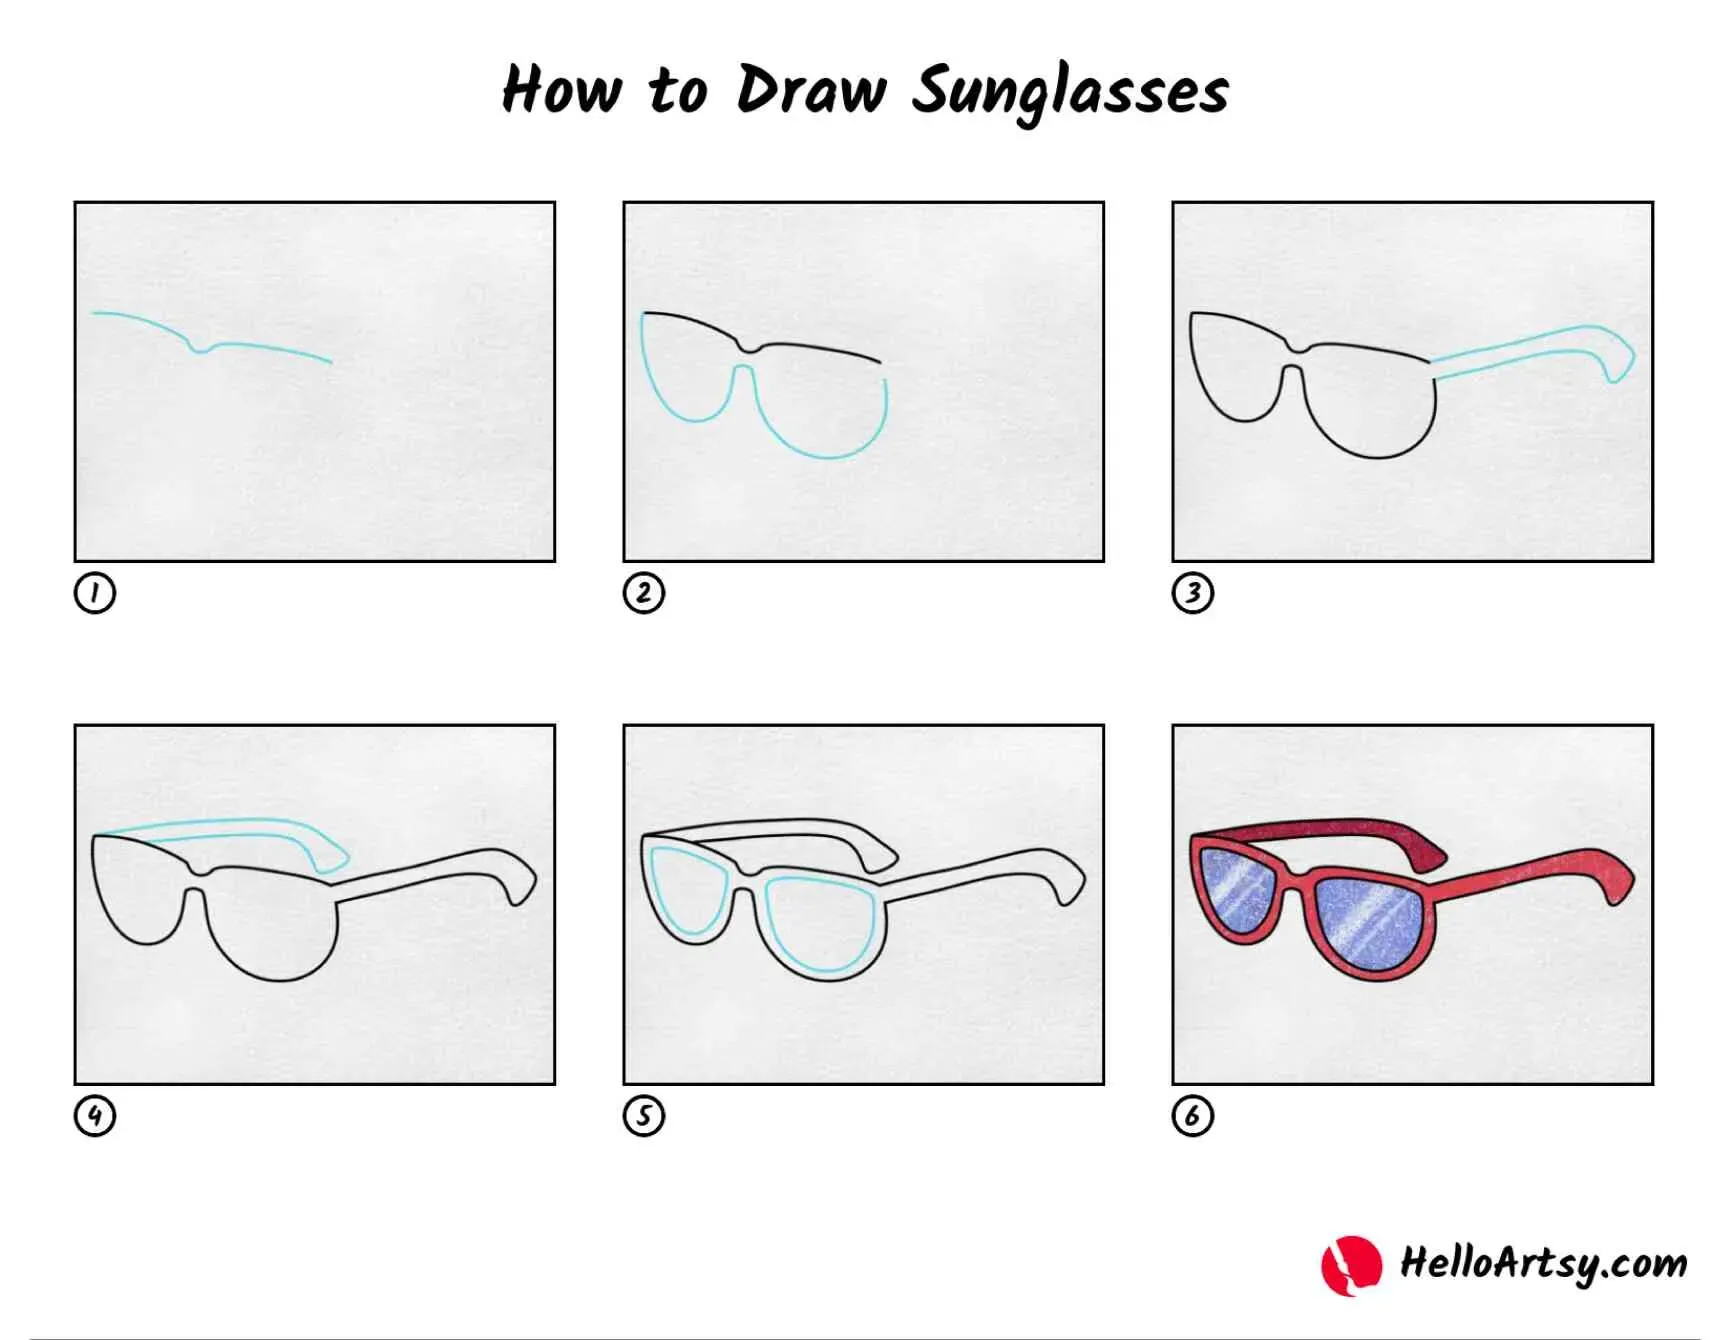
Making Lenses Pop: Reflections and Highlights
your basic shapes are down. They look like... well, shapes. To make them look like actual sunglasses, you need to add some life, and that usually means reflections. Think about how light hits glass or plastic. It bounces off. For lenses, this is crucial. You don't just color them in solid. Draw some curved lines or irregular shapes on the lenses to represent light bouncing off. These highlights often follow the curve of the lens. A common technique is a long, sweeping curve or a few smaller, brighter spots. This simple step instantly turns those flat shapes into something that looks like it could actually block the sun. Don't overthink it; just observe how light reflects on curved surfaces. It's not perfectly uniform.
Framing the Look: Thickness and Texture
Now, let's give that frame some personality. The initial outline was just a guide. Now you can refine the thickness. Are they chunky acetate frames? Or thin, wire-rimmed classics? Define the edges more sharply based on the style you're going for. Add a subtle line along the outer or inner edge of the frame to suggest its depth. Think about texture too. Plastic frames might have a smooth, solid look, while metal frames could have tiny details or joins. Even adding a small hinge where the temple arm connects to the frame makes a big difference. These small additions are where the style really starts to show.
- Add curved lines or shapes on lenses for reflections.
- Observe how light hits curved surfaces.
- Refine frame thickness based on desired style.
- Add subtle lines for frame depth.
- Consider texture: smooth plastic or detailed metal.
- Include small details like hinges.
Exploring Different Styles: From Aviators to Wayfarers
Exploring Different Styles: From Aviators to Wayfarers
Exploring Different Styles: From Aviators to Wayfarers
so you've got the basic idea of how to draw sunglasses down – the lenses, the bridge, the arms. But sunglasses aren't just one shape, right? That's where the real fun begins! Think about the iconic styles you see everywhere. You've got the classic Aviators, with their large, teardrop-shaped lenses and thin metal frames – they scream pilot cool. Then there are Wayfarers, chunkier plastic frames with a distinct trapezoidal lens shape, pure retro vibe. Don't forget round lenses, like the kind John Lennon wore, or sporty wraparounds that hug the face. Each style has its own defining features, and understanding those shapes is key when you're figuring out how to draw sunglasses that look like a specific type. Pay attention to the lens shape, the thickness and material of the frame, and how the bridge connects the lenses.
Bringing Them to Life: Shading and Finishing Your Sunglasses
Bringing Them to Life: Shading and Finishing Your Sunglasses
Giving Them Depth: Shading the Lenses and Frames
Alright, you've got the structure, you've got the style. Now, let's make these things look like they actually exist in a world with light and shadow. Shading is where the magic happens. For the lenses, remember those reflections you drew? Now, think about the rest of the lens. It's usually darker, but not uniformly so. The darkest parts are often near the edges or where the lens curves away from the light source. Use a softer pencil or blend your initial shading to create smooth transitions. Leave those highlight areas bright white or lightly shaded depending on how shiny you want them. For the frame, imagine where light is hitting it. The areas facing the light will be brighter, maybe even have small highlights themselves, while the areas facing away or underneath will be darker. This contrast is what gives the frame its three-dimensional look. A thin frame will need subtle shading, while a chunky plastic frame can handle bolder shadows to show its form.
The Final Polish: Adding Details and Cleaning Up
You're on the home stretch. This is where you refine your lines, clean up any messy guide marks, and add those tiny details that make your drawing pop. Go over your main outlines with a darker pencil or pen if you want a bolder look. Add small things like the tiny metal hinges where the arms connect to the frame, or maybe even a subtle logo on the temple arm if you're feeling ambitious. Look at real sunglasses for inspiration – the way the nose pads are shaped, the curve of the earpieces. If you plan to color your drawing, now's the time. Think about how the color will interact with your shading. A dark lens color like grey or brown will make those reflections stand out more than a lighter tint. This stage is about stepping back and seeing what small tweaks will make the biggest difference. Sometimes, just cleaning up a stray line makes the whole drawing look more professional.
- Shade lenses darkest near edges, leaving highlights bright.
- Use smooth transitions when shading lenses.
- Add shadows to the frame where light doesn't hit.
- Consider frame material for shading intensity.
- Refine outlines for a cleaner look.
- Add small details: hinges, screws, logos.
- Clean up all initial guide lines.
- Think about color choice and how it affects shading and highlights.
Putting the Shades On: Your Drawing Journey Continues
So there you have it. From some basic circles and lines, you can build up a pair of sunglasses that actually look like, well, sunglasses. We covered getting the structure right, tossing in the details that make them pop, and even dipped into the world of different frame styles. Nobody gets it perfect on the first try – or the tenth, probably. The real trick is just doing it. Grab your pencil, mess up a few times, learn from it, and keep drawing. Soon enough, adding a cool pair of shades to your artwork will feel like second nature, not a design crisis.